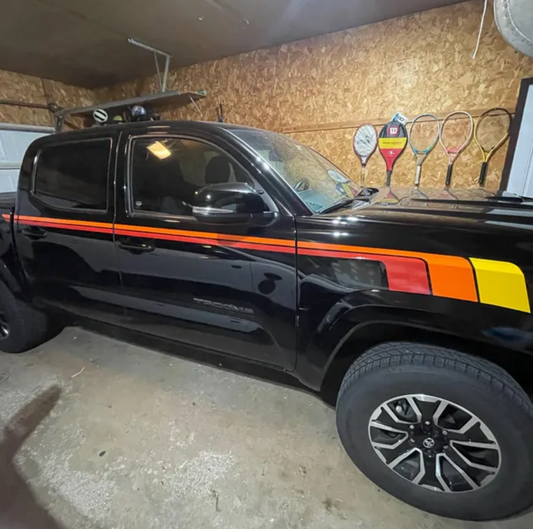
Installing a topographic sheet decal on your car windows is one of the most satisfying van and wagon builds you can do in a single afternoon. This guide follows the same process shown in our installation video using the Topographic Window Decal – Universal One Sheet on a Volvo XC70 P2 — but the method works on any car, van, SUV or estate with flat or near-flat glass.
What makes this product different
This is a full topographic sheet decal, not a pre-cut sticker. You get a single oversized sheet in your chosen size — 910×560mm, 762×470mm or 609×376mm — and trim it to fit your specific window. That means it works on virtually any vehicle and any window shape.
The topographic pattern is designed to maintain visibility from inside the vehicle — the open line design lets light through so you can still see clearly through the glass, unlike solid tint or full-cover window films. If you're concerned about blocking your view from inside, this is the design that solves that problem.

The decal shown in all example photos and the installation video is the black matte option. Matte finish sits cleanly on glass without reflections and gives the topographic lines a sharp, understated look. The product is available in multiple colourways — black matte is the most popular choice for dark or neutral vehicle colours.
If you're covering multiple windows — rear quarter glass, tailgate glass, or both rear doors — grab the bundle of 2 or more sheets and save. The XC70 P2 rear quarter windows are a perfect fit for a single sheet with some trimming.
What you need
- Glass cleaner (no wax)
- 70%+ isopropyl alcohol + clean microfibre cloth
- Masking tape
- Squeegee or old bank card wrapped in microfibre
- Sharp knife or razor blade for trimming
Step-by-step: topographic sheet install (dry method)
1. Measure your window first
Before you touch the decal — measure the window. Write down the height and width. Compare against your sheet size. The sheet should be slightly larger than your window so you have material to trim after application.
On the Volvo XC70 P2, the rear quarter windows sit at an angle. Account for that when measuring — the longest diagonal measurement is what matters.
2. Clean the glass thoroughly
Wash the window, then wipe with isopropyl alcohol on a microfibre cloth. This removes wax, oils and any residue that would prevent the vinyl from bonding properly. Let it dry completely before moving on. Dry application is unforgiving on dirty glass — any contamination will show as a bubble or lifting edge later.
3. Mark your position with masking tape
Hold the sheet up to the window and line it up exactly where you want it. Use masking tape to mark the top edge position on the glass. This step is more important with dry method than wet — you do not get a second chance to reposition once the adhesive touches the glass.
4. Dry application — hinge method
Run a strip of masking tape along the top edge of the decal to hinge it to the glass. This holds it in position while you work. Fold the decal up, peel the backing away completely, then slowly lower it down onto the glass from top to bottom. Dry application commits immediately on contact — take your time lowering it and keep it taut to avoid wrinkles as it lands.
5. Squeegee from top to bottom
With the decal laid down, squeegee firmly from top to bottom in overlapping curved strokes to compensate for window curve. Work out any air bubbles toward the edges as you go. On dry application you are bonding the adhesive directly to the glass — firm, deliberate strokes work better than light passes.
6. Trim to fit
With the decal fully adhered, use a sharp knife to trim along the window edges. Take your time — slow, clean cuts follow the glass line better than fast ones. On curved window edges, score lightly and follow the curve with small strokes rather than one long cut.
7. Final squeegee pass
After trimming, do one more squeegee pass across the whole surface. Pay particular attention to the cut edges — press them down firmly to seal them against the glass.
8. Peel and inspect
If your sheet has a transfer layer, peel it back slowly at a low angle. Check edges as you go. If any section lifts with the transfer layer, press it back down and wait a few minutes before trying again.
Small bubbles after install — normal
Small air bubbles can appear after dry installation, especially near edges. Most small bubbles work themselves out as the adhesive continues to bond over the following days. Give it at least a week before deciding there is a problem.
If you have a larger bubble that does not change after a week, prick it with a fine pin and press the air out toward the hole.
Why the Volvo XC70 P2 works so well for this
The XC70 P2 rear quarter windows are large, flat glass panels — ideal for sheet decals. The topographic pattern works particularly well on estate and wagon body styles because the large uninterrupted glass area lets the full design read properly. Smaller windows fragment the pattern and lose the effect.
If you're building out a full adventure wagon or overlanding setup, the topographic sheet across the rear quarter glass is one of the cleanest finishing details you can add.
Visibility from inside
One of the most common questions about window decals is whether they block the view from inside. With this topographic sheet design, visibility is preserved — the open line pattern lets light through and you can see clearly through the glass from the driver and passenger perspective.
This makes it a practical choice for rear quarter windows and rear glass where you still want to check blind spots and reverse safely. Solid tint film blocks the view — this doesn't.
Troubleshooting
Wrinkles while laying it down: with dry method, wrinkles mean the decal landed at an angle. Lift carefully from the nearest edge — dry vinyl can sometimes be peeled back if done slowly and immediately — re-align and re-lay.
Edges lifting after a day or two: the surface was not fully clean or it was too cold during application. Press the edges down firmly, avoid washing the car for 48 hours.
Bubbles that won't go away: prick with a fine pin, press air out toward the hole, squeegee over it.
Sheet too small for the window: size up. The 910×560mm sheet covers most standard rear quarter and rear door glass on wagons and estates. If in doubt, order the bundle — leftover sheet can be used on other windows.

Get the decal
The topographic sheet decal is available in three sizes and multiple colourways. Ships worldwide from Lithuania.
Shop Topographic Window Decal – Universal One Sheet →
Need more than one window covered? The bundle deal saves you money and ensures you have enough material for trimming without running short.
Watch the full installation video on the BROKENstickers YouTube channel.